Scrolling the Ground
In this section we're going to create a seamlessly looping ground using a single image and two draw calls.
How the Scroll Works
To create the scrolling ground effect, we're going to sample the same image twice at different positions.
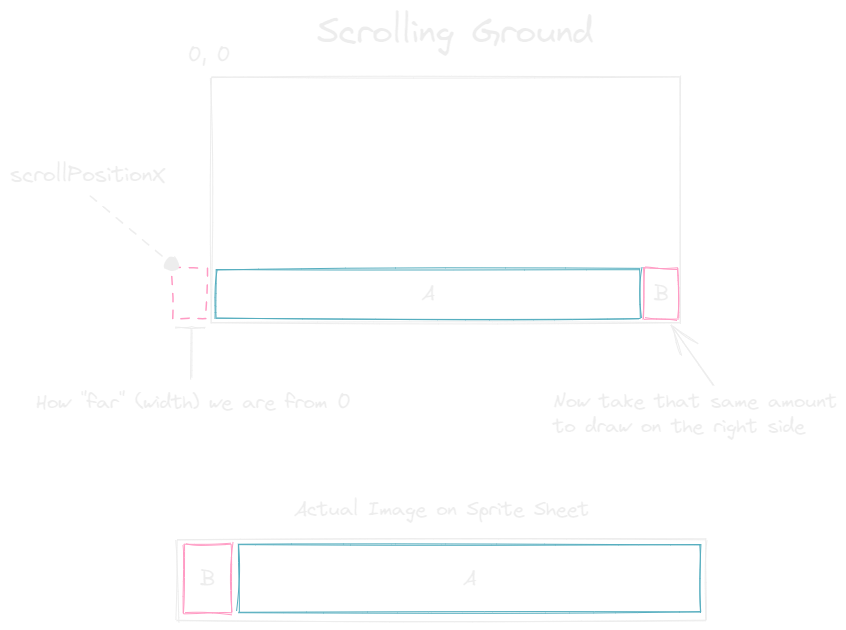
We're going to track a scrolling position along the x-axis: scrollPositionX. It will constantly be moving to the left by whatever our scrollSpeed is. The difference between this position and 0 will give us a value to leverage for sampling and drawing two portions of the same image. Once scrollPositionX reaches a position less (cause we're moving left - so negative) than the ground width, we reset to 0 and the effect repeats.
Updating the Ground Class
With that explanation in mind, make the following changes to the Ground class:
The update() and draw() methods need to be called repeatedly to constantly modify scrollPositionX, and render the current state. For that we'll need a game loop.
Before we move on, update the contructor call back in main.ts to set the scrollSpeed:
Game Loop
Games run within a loop, often referred to as the game loop. This loop typically runs on an interval to read input, update game objects, and display (render) the current state of the game to the player. A single iteration of the game loop is also commonly referred to as a frame, and the number of frames we can achieve in a second is our frame rate. Common frame rates might be 30fps and 60fps, where fps means frames per second. These frame rates help dictate our window of time to update and render the game.
Let's break a sample frame rate down. At 60fps, we would have roughly 0.01666 seconds (1 / 60) or about 16.67 ms to process a single frame. That may not seem like a lot of time, but you may be surprised what can be achieved in such a short period on a computer. Flappy Bird isn't a very intense game, so we shouldn't run into any frame rate issues.
Our game loop will make use of requestAnimationFrame(). It takes a callback function which is called before the next repaint in the browser. It also matches your display refresh rate, but it's possible it will be higher. An important thing to remember is requestAnimationFrame() does not give us a constant game loop with a single call, it simply schedules our callback function for the next available opportunity. This is up to the browser. So we need to make sure the callback function itself also calls requestAnimationFrame() to reschedule itself again, giving us a game loop.
Here's a sample game loop:
It's pretty common to group update logic such as moving entities and checking for collisions, and draw logic such as drawing sprites. We want to get the latest state of the game world before drawing, so we'll need to update the game entities before drawing them.
Tying It All Together
We have all the components to render the background and scrolling ground, we just need to fleshout the frame function. Note that we draw the background image first, then the ground. Draw order matters. We're also clearing the canvas before any drawing occurs. We redraw the state of the game each frame.
Let's add the frame() function and make use of update() and draw(). This can all be added to the bottom of the file:
We haven't talked about clearRect() yet. It's a method that clears a rectangular area of the canvas. We're starting at the top left corner of the canvas and clearing the entire canvas.
Clean Up
Now that we're drawing in the game loop, let's remove the original background drawing and ground drawing code outside the frame function.
Final Observations
You might notice the ground is scrolling quite fast. This is because we're scrolling the ground at 2 pixels per frame. So if your monitor is 60hz, that's 120 pixels per second. If you're at 120hz, that's 240, and so on. This isn't going to scale well. We can't have the game experience differing so drastically due to display hardware.
Reasoning about the speed of objects in the game in pixels per frame isn't a very intuitive way of dealing with change over time. It would be nice to focus on a higher unit of time, like pixels per second.
We'll need to account for the change in time for every frame of the game loop. We'll cover this in the next section.